2019年升级了装备 XPS 9370,但是 Solidworks 2014使用时非常卡。
XPS 9370 配置的是 Intel UHD 620 集显,公司还有个笔记本是 ThinkPad New S2,是HD 620显卡,solidworks 却不卡。

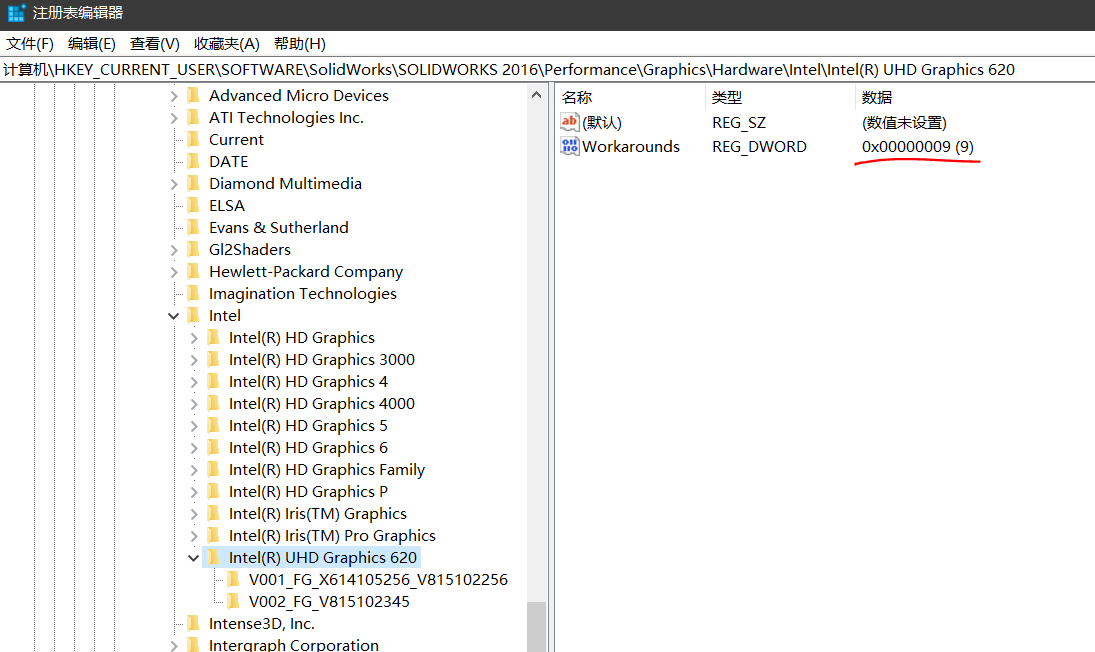
解决办法:改注册表

将 Solidworks 2016 原有的显卡系列随便选一个导出来,然后用文本编辑器打开,将显卡系列的名称(如 HD Graphics)改为 UHD Graphics 620,Workarounds 值改为 00000009。

或直接将以下导入注册表。

1
2
3
4
5
6
7
8
9
10
Windows Registry Editor Version 5.00

[HKEY_CURRENT_USER\Software\SolidWorks\SOLIDWORKS 2016\Performance\Graphics\Hardware\Intel\Intel(R) UHD Graphics 620]
"Workarounds"=dword:00000009

[HKEY_CURRENT_USER\Software\SolidWorks\SOLIDWORKS 2016\Performance\Graphics\Hardware\Intel\Intel(R) UHD Graphics 620\V001_FG_X614105256_V815102256]
"Workarounds"=dword:10000480

[HKEY_CURRENT_USER\Software\SolidWorks\SOLIDWORKS 2016\Performance\Graphics\Hardware\Intel\Intel(R) UHD Graphics 620\V002_FG_V815102345]
"Workarounds"=dword:10000080

以下方法已失效!


在网上搜了一圈大致有以下几个解决方法:

  • 一、在 Solidworks 的选项里,勾选启动 OpenGL 软件加速
    • 找到了 OpenGL 选项,发现默认是已勾选的,状态还是灰色的,根本改不了;
阅读全文 »

1.硬件安装

前一段用 tensorflow 玩深度学习,笔记本只能跑个 mnist,再大点的模型都跑不动。
试了腾讯云、极客云,用着也不方便。

还是上显卡吧!

  • 本来一门心思想买1080,看着看着RTX20系列出了,买新不买旧,那就买2070吧。
  • 学校有个台式机是dell optix 7020,小机箱,原装电源只有~300w。还得换个电源。
  • 机械硬盘还得再换个ssd。。。
阅读全文 »

前一段做试验,需要远程监控现场的电脑;
写了一个定时截屏并把图片发送至邮箱的脚本,这样微信就可以得到通知。

1. 截屏,并保存图片

1
2
3
4
5
6
7
from PIL import ImageGrab
import time

time_now = time.strftime('%Y%m%d-%H%M%S')
pic = ImageGrab.grab()
pic_name = time_now+'.jpg'
pic.save(pic_name)

2. 定时任务

1
2
3
4
5
6
7
8
9
10
11
12
13
14
15
16
17
18
import threading

def func():
t = time.localtime(time.time())
min, hour, wkday = t.tm_min, t.tm_hour, t.tm_wday
# --------add tasks here--------------------------
if min in [0, 15, 30, 45]:
print('tasks')
# --------tasks end----------------------------

global timer
timer = threading.Timer(60, func, [])
timer.start()


timer = threading.Timer(1, func, [])
timer.start()

阅读全文 »

处理excel数据时遇到了个问题,数据导出来总是不全。

后来发现是 *.xls 格式的问题:

xls格式 最大行数为65535

xlsx格式 最大行数为1048576(满足要求了)

而且xlsx文件大小只有原来的1/3左右。

但是手上有一大堆旧的xls文件需要转换。

解决方法:

安装pywin32

1
pip install pywin32

代码

1
2
3
4
5
6
7
8
9
10
11
12
13
14
15
16
17
18
19
import os
import os.path
import win32com.client as win32

## 根目录
rootdir = u'E:\\temp1'
# 三个参数:父目录;所有文件夹名(不含路径);所有文件名
for parent, dirnames, filenames in os.walk(rootdir):
for fn in filenames:
filedir = os.path.join(parent, fn)
print(filedir)

excel = win32.gencache.EnsureDispatch('Excel.Application')
wb = excel.Workbooks.Open(filedir)
# xlsx: FileFormat=51
# xls: FileFormat=56,
wb.SaveAs(filedir.replace('xls', 'xlsx').replace('XLS', 'xlsx'), FileFormat=51)
wb.Close()
excel.Application.Quit()

在vps上安装jupyter,设置远程访问。

0. 安装jupyter

1
pip install jupyter

1. 生成密码

打开python:

1
2
from notebook.auth import passwd
passwd()

根据提示输入密码,得到类似下面的密文:
‘sha1:ce23d945972*********’
复制下来。

2. 生成配置文件:

1
2
jupyter notebook --generate-config
# 生成完可以看到配置文件的存储位置

3. 修改配置文件

sudo nano jupyter_notebook_config.py

1
2
3
4
c.NotebookApp.ip = '*'
c.NotebookApp.password = u'sha:ce..粘贴密文..'
c.NotebookApp.open_browser = False
c.NotebookApp.port = 3333

4. 启动jupyter

1
nohup jupyter notebook  &

5. 远程登录

试试打开 http://xxx.xxx.xxx.xxx:3333
输入第一步设置的密码即可

PPT导出高分辨率的图片(300dpi)

1. 打开注册表

  • win + R 调出命令行, 键入 regedit , 回车

2. 查找注册表路径(Office 2016版):

1
HKEY_CURRENT_USER\Software\Microsoft\Office\16\PowerPoint\Options

3. 新建 DWORD 值(D)

  • 名称为 ExportBitmapResolution
  • 数值为 300 (十进制)

4. 打开需要的PPT,另存为或导出为图片格式。

准备

  • 需要两个 github 仓库:
    • 一个用于发布页面: shenbo.github.io
    • 一个用于放源码: hexo-source
  • 已配置好 hexo 的 VPS 服务器

1. 创建 hexo-source 仓库

  • 在hexo的source目录下( ~/hexo/source)运行:
1
2
3
4
5
6
7
8
cd hexo/source

git init
git add .
git commit -m "first commit"
git remote add origin https://github.com/shenbo/hexo-source.git

git push -u origin master
阅读全文 »

生成一个 dataframe

1
2
3
4
5
6
7
8
9
10
import pandas as pd
import numpy as np

df = pd.DataFrame(np.random.rand(2, 4))
print(df)

#
# 0 1 2 3
# 0 0.714730 0.566612 0.764352 0.728862
# 1 0.823414 0.662657 0.800281 0.711702
阅读全文 »

pandas显示完整的行或列,避免省略中间行或列、以及自动换行。

1
2
3
4
5
import pandas as pd

pd.set_option('display.width', 1000)
pd.set_option('display.max_rows', 500)
pd.set_option('display.max_columns', 500)

1. 由字符串格式生成时间数据

1
2
3
4
5
6
7
8
9
import pandas as pd
import numpy as np

# string datetime --> pandas datetime
dt_start = '2018-07-04 12:00'
pd_dt_start = pd.datetime.strptime(dt_start, '%Y-%m-%d %H:%M')

print(dt_start) # 2018-07-04 12:00
print(pd_dt_start) # 2018-07-04 12:00:00
阅读全文 »

1. 由字符串格式生成时间数据

1
2
3
4
5
6
7
8
9
import pandas as pd
import numpy as np

# string datetime --> pandas datetime
dt_start = '2018-07-04 12:00'
pd_dt_start = pd.datetime.strptime(dt_start, '%Y-%m-%d %H:%M')

print(dt_start) # 2018-07-04 12:00
print(pd_dt_start) # 2018-07-04 12:00:00
阅读全文 »

pip 安装 pyqt5-tools

1
pip install pyqt5-tools -i https://pypi.mirrors.ustc.edu.cn/simple/

启动 pycharm, 打开 Settings -> Tools -> External Tools

  • 点击+,添加工具

  • 添加 pyqtdesigner

1
2
3
4
5
- Name:  pyqtdesigner

- Program: C:\......\designer.exe

- Working dir: $ProjectFileDir$
  • 添加 pyuic5
1
2
3
4
5
6
7
- Name:  pyuic5

- Program: C:\......\pyuic5.exe

- Arguments: $FileName$ -o $FileNameWithoutExtension$.py

- Working dir: $FileDir$

ffmpeg 使用说明

查看使用说明:ffmpeg -h

1
2
3
4
5
6
7
8
9
# usage: 
ffmpeg [options] [[infile options] -i infile]... {[outfile options] outfile}...

# options:
-ss: set the start time offset
-f: force format
-t: record or transcode "duration" seconds of audio/video
-r set frame rate (Hz value, fraction or abbreviation)
-y: overwrite output files
阅读全文 »

ref: excel_formulas_and_functions, https://support.office.com/en-us/article/overview-of-formulas-in-excel-ecfdc708-9162-49e8-b993-c311f47ca173?wt.mc_id=fsn_excel_formulas_and_functions

0 示例表格

A B C
1 NO key value
2 1 0 0
3 2 5 25
4 3 10 100
5 4 15 225
6 5 20 400
7 6 25 625
8 7 30 900
9 8 35 1225
10 9 40 1600
11 10 45 2025

1 已知key,查找对应value

  • VLOOKUP(lookup value, lookup array, column, range lookup)
F G H
4 key Formula value
5 20 =VLOOKUP(F5,B2:C11,2) 400
6 25 =VLOOKUP(F6,B2:C11,2,FALSE) 625
7 24 =VLOOKUP(F7,B2:C11,2) 400
8 24 =VLOOKUP(F8,B2:C11,2,FALSE) #N/A
阅读全文 »

有道翻译 API 简介

参数说明:

  • i="text",引号内为要翻译的单词或句子,中文、英文都行,默认是中英互译;
  • doctype=xml,指定返回值的格式为 xml 格式,还可以是 textjson

其他可选:

  • type,默认是type=auto;可以指定语言,比如中文->日语:type=zh_cn2ja
  • version,指定 api 版本等

在 excel 里调用有道翻译 api

  • 首先用 WEBSERVICE 函数获得调用 api,返回值格式指定为 xml;

  • 然后用 FILTERXML 函数解析 xml,翻译的结果在 <translation> 标签里面

  • 完整代码如下:

1
=FILTERXML(WEBSERVICE("http://fanyi.youdao.com/translate?&i="&A1&"&doctype=xml"),"//translation")

这个 api 有调用次数的限制,且用且珍惜。

之前常用的物性计算软件是 Nist Refprop,在 Excel 中计算时调用起来非常好使。
但是计算方程组求解时 Excel 就不太好用了。。

发现了一个开源软件:CoolProp,它支持多种程序或语言的调用,接口比较好;
对 python 的支持也非常方便。

1. 安装 CoolProp

  • 直接使用 pip 安装:
1
pip install CoolProp
  • 或者安装开发版(稳定版偶尔有编译问题,导致安装失败):
1
2
# install the latest nightly release version
pip install -vvv --pre --trusted-host www.coolprop.dreamhosters.com --find-links http://www.coolprop.dreamhosters.com/binaries/Python/ -U --force-reinstall CoolProp

2. 基本使用

2.1 参数说明

ref: http://www.coolprop.org/coolprop/HighLevelAPI.html

D, DMASS kg/m^3 Mass density 密度
H, HMASS J/kg Enthalpy
P Pa Pressure 压力
Q mol/mol Mass vapor quality 气体占比
T K Temp 温度
A, SPEED_OF_SOUND m/s Speed of sound 声速
CONDUCTIVITY, L W/m/K Thermal conductivity 热导率
CVMASS, O J/kg/K Mass specific constant volume specific heat 定容比热容
C, CPMASS J/kg/K Mass specific constant pressure specific heat 定压比热容
I, SURFACE_TENSION N/m Surface tension 表面张力
M, MOLARMASS kg/mol Molar mass 摩尔质量
PCRIT Pa Pressure at the critical point 临界压力
TCRIT K Temperature at the critical point 临界温度
V, VISCOSITY Pa·s Viscosity 粘度
Z Compressibility factor 压缩系数
  • 示例1:
1
2
3
4
5
6
7
from CoolProp.HumidAirProp import HAPropsSI
from CoolProp.CoolProp import PropsSI

p = 101325
t = PropsSI('T', 'P', p, 'Q', 0, 'Water')
print('\n-------------CoolProp-------------')
print('- 在 {} Pa(abs) 时,水的饱和温度: {:.2f} K \n'.format(p, t)) # 373.12 K
  • 示例2:
1
2
3
4
5
6
7
8
9
10
11
12
13
14
15
from CoolProp.HumidAirProp import HAPropsSI
from CoolProp.CoolProp import PropsSI
paras = {'D': 'kg/m^3',
'H': 'J/kg',
'A': 'J/kg/K',
'L': 'W/m/K',
'O': 'J/kg/K',
'C': 'J/kg/K',
'M': 'kg/mol',
'V': 'Pa.S',
'Z': '-'}

for (k, v) in paras.items():
v1 = CP.PropsSI(k, 'T', 273.15+20, 'P', 101325, 'water')
print(f' {k}: {v1:10.4f} {v}')
阅读全文 »

Nist Refprop 是一个常用到的物性计算软件,在 Excel 中调用起来也比较方便。

1. 安装 Nist Refprop V9.1

安装完之后:

  • 32位系统默认安装路径是 C:\Program Files\REFPROP
  • 64位系统默认安装路径是 C:\Program Files (x86)\REFPROP
阅读全文 »

1. 新建远程仓库

1
2
3
4
5
6
7
cd ~/xxxx
git init

git add .
git commit -m "first commit"
git remote add origin https://github.com/shenbo/xxxx.git
git push -u origin master
阅读全文 »

20170626

可遇不可求的事

此时此刻的你

1. os.popen 命令

python 内置的 os.popen 命令可以用于执行简单的命令。

1
2
3
4
5
6
7
8
import os

# 直接运行的命令,如:打开记事本
os.popen('notepad')

# 获得运行的log或结果,如:列出文件清单
r = os.popen('tree')
print(r.read())

2. subprocess 模块

复杂一点的命令可以使用 subprocess 模块,也是 python 内置的,可以对输入/输出进行操作;

2.1 subprocess.call 命令

1
2
3
4
5
6
7
8
9
10
11
import subprocess

# 可显示运行log/结果
subprocess.call('pip list', shell=True)

# 可交互
subprocess.call('pip uninstall pip', shell=True)

# 返回值为错误代码
retcode = subprocess.call('tree', shell=True)
print(retcode)

2.2 subprocess.Popen 命令

1
2
3
4
5
6
7
8
9
10
import subprocess

# 获得运行结果,一次读取所有,要等待命令运行结束
p = subprocess.Popen('ping baidu.com', shell=True, stdout=subprocess.PIPE).stdout
print(p.read().decode('gbk'))

# 获得运行结果,一次读取一行
p = subprocess.Popen('ping baidu.com', shell=True, stdout=subprocess.PIPE)
for line in iter(p.stdout.readline, b''):
print(line.strip().decode('gbk'))

subprocess.Popen 参数比较复杂,更多用法参见:
帮助文档